![]()
![]()
![]() Sphere
grinding machine
Sphere
grinding machine![]()
![]()
|
|
|
|
|
|
|
|
![]()
|
|
|
|
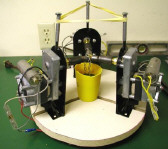
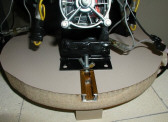
How to Assemble and Use your Marble Reconditioning Machine
The motors are small and turn no faster than 105rpm and have 1/4" shafts. Each motor cost less than $10.00 each and three are required per machine. If you want to order by phone...it's SURPLUS CENTER "AC gear motor", page 129
ITEM 5-930 100 RPM, 115VAC $6.65 Ph# 1-800-488-3407
The base is made from a piece of counter top and is cut 12" in diameter. (Round or hex) The metal pieces required from 10 gauge sheet metal. (Can use up to 14 gauges) Three pieces cut 6X3" for the uprights. (Holds the motors). Three fairly heavy duty hinges are needed 3" wide. These will be welded to the bottom of the uprights. Make sure that the hinges have a screw hole in the middle of the flanges. Now we need six plates cut from the same metal 4" long and 1 1/16" wide. These will be mounted on the base with at let two wood screws each. Three 3/8" by 1" bolts will be needed with double flat washers and nuts.
When you receive the motors each will have a starter as I call it. These will have to be glued onto the top of the motors with the wires to the rear. Do this first so that they will have plenty of time to "set" up.
Once you have cut your base, (12" in diameter-round or hex) you are ready to cut the grooves. The next part is critical. Measure the base into three equal parts. (Like a pie) These must be absolute. Draw a line from the outside edge to the center. Using a radial arm saw or a saw that you can cut straight with, cut a groove 1/2" deep by 9/16" wide by 4" long.
Leave the groove sloped at the end toward the middle. (This is for cleanout) Now, mount the base plates along the groove using a fairly good sized wood screw. There will be a plate on each side of the groove. Now you have the track.
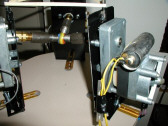
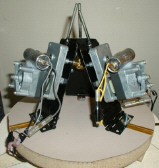
Now for the uprights. On one end weld a 1/4" by 3" hex head bolt in the dead center. The hex head will be up and 2 1/2" above the end of the plate. On the other end of the upright and on the other side weld the 3" wide butterfly hinge. The center of the hinge should be even with the bottom of the plate. When welded on it should leave half of the hinge to swing free and easy. Make real sure that the center hole in the hinge is in the exact center of the plate.
Now for the motor mounts. Measure down from the end that the bolts are welded onto 1 1/2" and bore a 3/4" hole in the upright in the exact center. Place the motor with the shaft end through the 3/4" hole and mark for the four screws that holds the motor. Bore these holes and mount the motors.
Take the 3/8" by 1" bolt and put the flat washer on it. With the head and washer down slide it into the groove on the base. Make sure it will slide back and forth in the groove easily. Than weld the washer to the head of the bolt. Now that you have the motor mounted on the upright, place the hinged end down onto the track and the tract bolt through the center hole in the hinge. Screw a hex nut (no washer) onto the screw and you now have a machine ready for wiring. The upright should slide back and forth along the track and swing back and forth on the hinge. Everything that I have said will be done for all three positions on the base.
You will need to order flexible adaptors for the motor shafts. This is very important. They will be ordered from McMaster-Carr Supply Company, 600 County Line Road, Elmhurst, IL 60126-2081. The part number is 50385 K43. You will need three (3) for each machine. I suggest that you get at least a few extra's. The last ones that I bought cost $1.98 each. They are Brass Vibra-Tamer compression tube fitting Male pipe adapter, 1/4" pipe.
I use pipe fittings for grinding the marbles down and the same ones for pre-polishing. Either black pipe or galvanized. The one I use the most on small marbles is a 1/4" coupling with a 1/4" close nipple. These are screwed right onto the flex coupling that is on the motor shaft.
Nail or screw four "legs" 1" thick and three or four inches long to the bottom. This will allow you to run your wiring under the base. Bring the power source wire (from lamp cord or some like electric wire) to the center underneath (use electric "u" clamp fasteners to secure the wires to the bottom). Extend the wires coming from the motors to reach the center underneath and wire them to the power cord (male plug-in on one end of power cord). Do this for all three motors. Than using clips fasten to motors. All motors must turn in the same direction. Very little power is needed so don't worry about the gauge of the power source cord.
Before I forget it again the phone number to order the flex couplings is 630-833-0300. That is the phone number for McMaster-Carr.
Here is a link to McMaster-Carr for the flexible adaptor(s)
www.mcmaster.com. Just type 50385 K43 in the "find product" space.
Well now, if everything went well so far you should have a nice Sphere (reconditioning) machine ready to go to work. So, what do we need now? First we will need grinding heads. I use pipe fittings, however some people use plastic fittings. Plastic doesn't last nearly long enough for me.
Step one--Grinding out all the nicks and impacts. 1/4" close nipple screwed into a 1/4" coupling.
This coupling is screwed onto the adapter that you have already mounted on the motor shaft. By the way, don't tighten the adaptor too tight on the motor shaft. There is a flat rubber washer inside the hex nut on the motor end of the adaptor. Tighten tight enough that you can't pull the adaptor off of the shaft. You will make adjustments as you work on marbles.
The end of the flex-adaptor is open in the middle. Fill this with some good filler to keep the compounds from running back onto the shaft. In time this would cause the gear reduction box to go out.
As you progress you will need other sizes of fittings, but for now we will just work with the one that I mentioned.
In a plastic or old coffee cup put in 2 teaspoons (heaping) of the 220 grit that we will discuss shortly. Use double cups. Then fill the cup a little over half full with anti-freeze. (Do not use water) You will have to stir this every few minutes until it becomes thick enough to keep the 220 grit in suspension. (Several days the first time around) Never and I mean never change this material. Just keep adding to it. Both grit and anti-freeze. At times you may have to dump some out in order to add more anti-freeze. After the material is thick enough to keep the grit in suspension you can add a teaspoon of grit once in awhile. Always keep the material stirred as the grit will settle to the bottom even after it has become fairly thick.
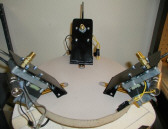
Here I must say a word of caution. Keep this material away from children and pets. It is lethal in the smallest amount if ingested by a pet or a child. (Due to the anti-freeze, not to mention what 220 metal grit would do) At this point you need to hang your chain. Use the smallest chain you can buy at the hardware store. You will cut the chain and make it into a continuous belt, that when hung on one of the grinding heads won't quite reach the machine base. You will place the cup in the center of where the three grinding heads meet.
Now for a discussion on material.
You will need the following: I buy my compounds from Ebersole Lapidary Supply, Inc. 5830 W. Hendryx, Wichita, KS, 67209-2351, phone number 1-877-323-7765. They do accept credit cards.
Grinding compound: Item number 50-0282 (220 GRIT) Current price is $3.80 per pound. This material is Faceting Grit of the highest quality available and is 100% Virgin Silicon Carbide Abrasive Grain. It is harder, sharper and has faster cutting action than most other comparable grits. This is the grit that you will use in step one. (Removing the nicks and impacts) Use with anti-freeze.
Pre-polish material--Item number 50-0290 (1000 grit) current price is $14.00 per pound Material is same as above only 1000 grit. This is used in the second step. Use with anti-freeze.
Polishing compound--Item number 50-0330 (final polish) Current price is $10.00 per pound. This is a polishing compound of the highest quality available. Super Rapid Aluminum Oxide. Use with water and wooden polishing heads and we will visit about this later. I suggest that you start with 5 pounds each of the three materials.
Well now, so you've gotten the marble to stay in the heads and turning every which direction. It's now about time to stop the machine and see how the marble is coming. CAUTION, CAUTION, CAUTION. Never wash a marble that has been in the heads for very long in cold water. Always and I mean always use warm water. The marble may feel icy cold on the outside, but the interior of the marble may be hot enough to cause it to fracture if put in cold water.
After seeing that you need to grind it some more put it back in the heads and turn on machine. If the marble is clean, it's time for pre-polish. Take the heads off and wash them clean. Get every speck of 220 grit off and out of them. Do the same for the adaptors on the motor shaft. This is a must because if one grain of 220 grit remains it can cause streaks on the marble. Reassemble the heads.
In your new Solo plastic cup put two heaping teaspoons of the 1000 grit and add anti-freeze to just above half. After making sure that the marble will stay in the heads again after being off, place the cup under the marble. Make a new chain for this step and from than on keep it separated from the one used in the 220. Now turn on your machine and make sure once again that the marble is turning in every direction. Leave in for at least one hour and than check it to make sure there are no streaks. If not you are ready for final polish which I will talk about on page 8. Again never wash a marble that has been in a machine in cold water and it makes no difference what step it was in.
I use wooden tongue depressors to stir the compounds and you must have one for each compound. Do no use the same tongue depressor in the 1000 grit that you used in the 220 grit. You may think you have washed it clean, but don't bet on it.
Well now, first a few words about the grinding heads. As I've said I use pipe fittings. (Metal) Plastic will work and if you use plastic I need to caution you to never use the plastic heads that you used in the 220 grit to pre-polish. The reason is because the 220 grit will become imbedded in the plastic and this will cause your marbles to be streaked. What is a streak? A streak is a gouge line on the marble surface and here is where some reconditioners leave marks on marbles.
After you pre-polish look for these marks under at least a 20X loop. If some are present on the marble, clean up the machine once again, add a teaspoon of 1000 grit to your compound container and start over. Do this until all marks are removed from the marble. The longer you keep the marble in the pre-polish the harder it will be to tell that the marble has been reconditioned. Usually one hour in pre-polish and one hour in final polish is adequate, unless it is over 1" in size, a bit longer may be required.
WOOD DOWEL UPDATE
Use wooden candle cups from Hobby Lobby. These are made out of wood and the ones that I have are 7/8" X 1". They can be force screwed right onto the 1/4" flex-adaptor. There is a small hole in the center of the end and you will need to "dish" (where the marble goes) this out with a drill and bit. With the small hole as the guide the "cup" will be centered. They work perfect for me. Here is the item number at Hobby Lobby: 165894 Candle Cup Value pack; 22 pcs. 7/8" X 1". 22 pcs or cups cost all of $2.99. Easier than using the dowel rods mentioned below.
Well now, we have the marble ready for final polish. First we have to make the polishing heads and these must be made from wood. Caution-Never use oak. Oak has about three different oils in it and will leave a rather dull shine on the marble. I use dial rods of various sizes. I'll talk about the 3/8" size. First if you have a drill press, pick a bit that will just cover the end of the rod and "dish" or "cup" out the end. Do not leave shoulders on the dish or cup. The more surface of the wood that touches the marble the better. You can use two dowel rods of one size, and the other dowel rod can be a larger diameter to help hold larger marbles. This puts more wood surface on the marble.
After you have a nice dish or cup in the end saw it off 1 1/4" long. Now sand or whittle the sawed of end down to the point that you can screw it into a 1/4" coupling. The interior threads of the coupling will cut threads in the wood and hold it in the coupling. Do this for all three heads. I use dowel rod sizes all the way up to and including 3/4".
Now you are ready to final polish a marble. Here again, Patience, Patience, Patience. You may have to work with the machine to get it set properly. In a Solo clear cup put 2 heaping teaspoon of final polishing material. (White powder) Add water to a half inch above the powder and stir. It is now ready for use.
Make a new chain for this step and keep it separate from the others. I leave a marble in the final polish for at least one hour and sometimes up to 4 hours. You won't have to stir the compound nearly as much as you did the 220. By the way, you won't have to stir the 1000 grit much at all. When checking the progress of the marble, again I caution you to never put it in cold water. Sometimes if my hands are real cold (most of the time), I will warm them in the warm water before handling the marble. You will find that you will wash your hands more often in a day than a doctor does.
When setting the uprights for working on a marble, make sure that they are tilted in at the top 10 to 15 degrees. This will make it downhill from the coupler grinding head to the marble. This will cause the pickup chain to run on the marble side of the coupling and against the marble. Don't worry about this hurting the marble as glass is harder than metal and that's right where you want the chain to run. This tilting of the heads is also a must to help the turning in every direction of the marble in the heads.
A few words about the flex-adaptors. Due to the shaft hole being cut too small in the uprights on my machines the bottom edge of the upright shaft hole will finally cut the back of the compression nut off and then I have to replace it. I had you folks cut the holes bigger and I don't think you will have this problem. If you do, I have figured out what to do.
First, don't expect McMaster-Carr to sell you any parts separate for the flex-adaptor. You have to buy the whole thing (they won't even sell you the bubble washer). I didn't like that, so I did some leg work and found another way. Here it is. First go to an auto store and pick up some hose (UPC 038244768552 0488 OD 7/32"OD ID 5.6mm). Outside diameter is 7/16" and the inside diameter is 1/16" (about 30 cents a foot). This will work and you should have some on hand as the rubber will wear out in the adaptor. Use the old rubber washer to cut the length of a new one. If the hex compression nut gets ruined like they do sometimes with my machines, you will need to replace it. I finally found a hex nut that will work at True Value. It is as follows: Master Plumber-5/16 or 5MM compression hex nut (2 for $1.79). Number 287-631. Much, much cheaper than buying the entire Flex-adaptor.
What do you do to get the compounds out of the surfaced bubbles and etc? Buy yourself a "sonic" for about $38.00 or so. This is the same thing that a Jeweler uses to clean jewelry. It's an almost must if you are planning on reconditioning marble. Make sure you get a nice ultra-sonic cleaner. The cheap ones don't work. You want to make sure there is no white polish showing in any of the pits.
Let's talk about sizes of grinding and pre-polish heads. Using the 1/4" all thread nipples a person will soon have the threads coming loose and binding up the machine (when this happens, I use pliers to break them off and keep going). There is a way around this. I'll talk about the 1/4", but this can apply to bigger sizes also. Using a 1/4" by 2" nipple, saw them in half. This gives you an area of pipe with no threads. Dish out the non thread end with a drill and bit. Not much, but good enough that there is a cupping to hold the marble. Screw the threaded end into a 1/4" coupling and than on to the adaptor on the motor shaft. You now have a grinding/pre-polish, trouble free head that will do several marbles.
This size machine isn't large enough to work on marbles bigger than 1 1/2". In order to work on the marbles, say from 1" up to 1 1/2" it's best to use bell reducers. For instance, if you are going to work on a marble that is 1 1/2", I use bell reducers that measure 1/2" by 1/4". Of course the 1/4" end will screws onto the adaptor leaving the 1/2" end as your grinding heads. If I'm working on a marble that is 1" I use the 1/4" by 3/8" bell reducers and so on. Don't be afraid to experiment with the various sizes.
I will be glad to answer as many questions as I can. If I don't have the answer, I'll find it. I can call on my mentor (Ed Junker) and between the two of us we can come up with the answers. Remember there is no such thing as a stupid question, so don't be afraid to ask a question.
One question that has been asked was why two pickup chains are on the machine in the pictures. There are a couple of reasons for this. Sometimes the marble just won't turn right unless the uprights are to straight up to keep the chain running next to the marble and by adding more chains it will force them where I want them. Another reason is some times the material is to thick for one chain to turn fast enough (another answer to this is to pour off some on the material in the cup and add more anti-freeze to thin it down).
Another question: Do you have to stay right with the machine while a marble is turning in it. The answer is no. Once you have mastered the machine (I wonder if we ever do) you don't have to be there for periods of time. I check on my machines as a general rule about every 15-20 minutes. Sometimes with a big marble that is badly hurt and will require lots of time in the machine, I'll check on it about every hour.
The only thing I will add is that the motors/capacitors have to be wired in parallel. That means that the cord you use for the 115 volt supply should be wired to all the motors, so when you plug it in, you start all the motors at once. Another option would be to wire in a switch on the base plate of the machine. I assume that all the motors should rotate in the same direction.
To wire in a switch is simple. Just cut one of the 115 volt wires and put one wire on one terminal of the switch, and the other wire on the other terminal and then on to the motors. The other wire will remain unbroken and follow through to the motors.
I suggest you do this with the cord unplugged unless you would like to take the chance of having your zipper welded shut.
A word about the feet or legs under the base of the machine. 1"x2"X3" or 1"x4"x3" will work just fine. Place them centered directly under the motor uprights. Before you do, cut a 1/4" or 3/8" groove in them about 1/2" deep. Than nail or screw them under the base. Make sure that the outside edge is even with the outside edge of the base. You may mount them with the groove up or down. This groove will hold the wiring coming out to the motors. I have them both ways, but prefer the groove down. This keeps anything from collecting in them. All wiring will meet at the center of the underside of the base and can be fastened into position.
Don't forget that the hinges have to be welded onto the bottom of the uprights.
|
|
|
|
|
|
|
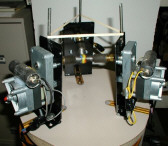
Bruce,
Here's a few pictures of the machine from different angles. You should be able to do this in a larger version with your bigger motors. I will have to send the MS Word .DOC file from my office, I don't have it here at home.
Here is some info on the grits I use: I purchase from Ebersole Lapidary Supply in Wichita, KS.
220 faceting grit is 100% virgin silicon carbide abrasive grain. It is harder, sharper and faster cutting action than most other grits. use with anti-freeze.
1000 grit is the same as above. Use with anti-freeze.
Polishing compound for final polish. Super rapid aluminum oxide. Use with water.
I use McMaster-Carr to buy all my brass compression fittings. www.mcmaster.com
Let me know if you need any more info. Talk to you soon.
Craig |
|
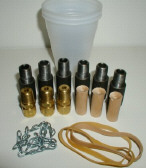
1. 220, 1000, and final polish compounds. 2. Large rubber bands. 3. Small chain from hardware store. Need enough chain for each grit. 4. ¼" pipe nipples & ¼" pipe couplings. Black steel is fine. 5. 3/8" and larger wood dowel rods from hardware store. 6. Additional brass flex couplings for each grit. (9 total) 7. Three old coffee cups or plastic cups to hold the grit. 8. Anti-freeze to mix the grit with. 9. Ultra-Sonic jewelry cleaner. (Nice one) Clean your marbles with it after polishing to get white grit deposits off marble.
TIPS
1. Keep the distance between motors evenly spaced. Look at the distance the back of the motor support is from the edge of the base. This should be equal all the way around for each motor base. 2. Always seal the brass compression fitting with silicone. There is a small hole in the middle of the fitting. Seal it up. This prevents grit from getting onto the motor shaft. This will extend the life of your motors. 3. Experiment with wood dowel sizes. I use two ½" or so dowels and one ¾' dowel for most marbles. This helps hold it in easier, and also puts more wood on the marble for a better finish. 4. Use 1 or 2 rubber bands for tension. If one doesn't seem to be enough, just add another with it. Don't get is too tight so as not to bind up the motors. 5. How much time for each grit? 220 - 10 minutes to ? Check the marble every 10-15 minutes to see if your are down far enough. I usually rinse and dry the marble to check the progress. 1000 grit - 1 hour Final polish grit - 1 hour to 1 ½ hour. Again, check the marble to make sure it's coming along ok. Stir your grit regularly. 6. If the marble you are working on is out of round to begin with, it may stay that way. You can't always take off enough glass to get it perfectly round. 7. Make sure your marble is turning every which way in the heads. If it is only turning two directions, it can make the marble out of round. I make slight adjustments to the rubber bands every 15 minutes or so to make it turn just a bit in a different direction to prevent this.
Additional information on what and where to buy the above items is listed in the 'How to use your marble machine' instructions.Contact me with any questions and I will be glad to help.
Craig Snider
|